


Introduction Kubernetes and Kustomize: How to easily customize any resource configuration with Kustomize?
Part 1 Introduction to Kustomize


Introduction
In Kubernetes, like in any other ecosystem in computer sciences, we need to use the notion of Configuration to pilot our different processes.
With Kubernetes, we drive the different resources (workload, deployment, pods, configmap, secret, services etc).
A resource is an endpoint in the Kubernetes API that stores a collection of API objects of a certain kind; for example, the built-in pods resource contains a collection of Pod objects.
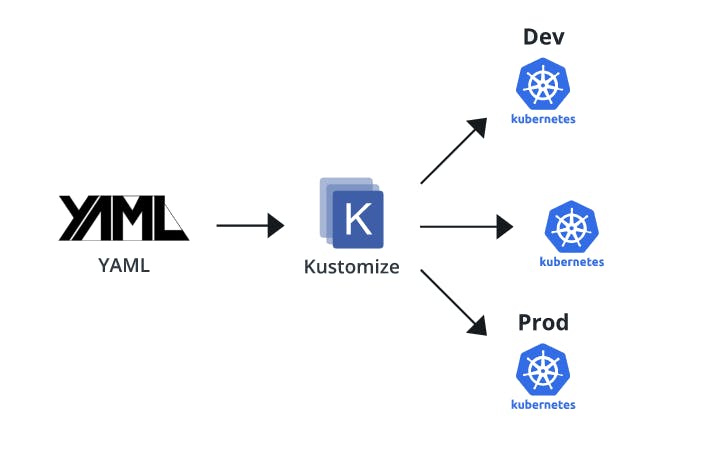
And like in any ecosystem, we can have several different environments. So in Kubernetes K8s we could have the following commonplace situation:
- Development environment
- QA environment
- Production environment
In this first part about Kustomize, we will focus on one type of resource here for our tutorial: Workloads and we will see how to kustomize the number of replicas per environment :-)
In other words, we will study how to customize a deployment per environment. Today we will use one common setting: the number of pods.
Because obviously, it is higher in production than in other environments.
So we will see how Kustomize can help us override the configuration for one workload.
In the next section, we look at what's exactly Kustomize.
Kustomize
First thing: Why using Kustomize is the best option even when we have tools like Helm.
Pros and Cons
Kustomize is way simpler than Helm. It doesn't need complexe templates, it doesn't even need to be installed if you use the kubectl recent enough. As a matter of fact, kubectl with version 1.14 and beyond can use Kustomize.
Integrated with kubectl since 1.14, it allows you to make declarative changes to your configurations without touching a template.
So basically we need to do nothing but just use Kustomize with kubectl with some options!
Moreover we don't need to use templates and the yaml files used to configure the k8s resources will be left untouched by Kustomize between the different environments!
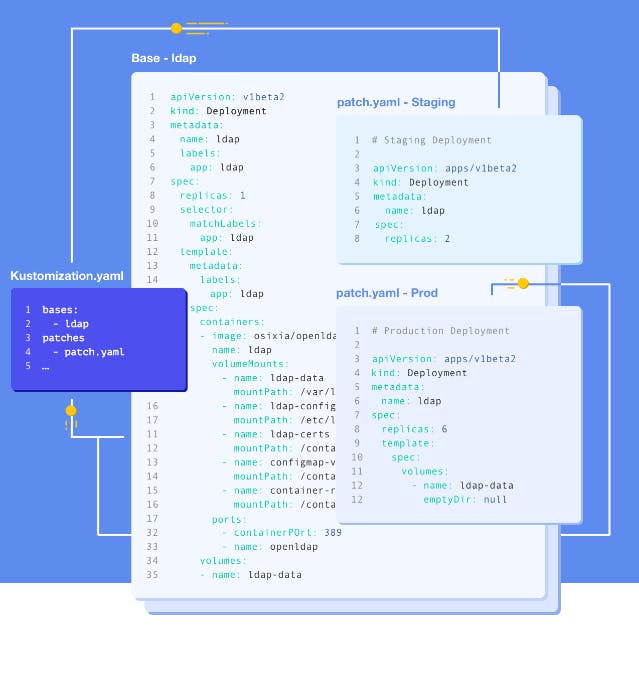
Now for our need, we will use the notion of patch with one base and overlays. We will explain what these 3 words mean later on.
We will see how easy it is to use Kustomize even for more complex situations. As a matter of fact, we can also use Kustomize for handling the cluster state throughout the code.
Now let's see the cons
With Kustomize we will need to add further files so we can tell the Kustomize tool what to do. But otherwise it is a very good and flexible approach.
How can Kustomize be used?
Kustomize can be used in three main different ways:
- Settings fields of our kubernetes resources (setting namespace, settings or adding name, common labels or annotations)
- Customizing our kubernetes resources (by applying patches with patchesStrategicMerge or patchesJson6902)
- Generating resources from other sources
In this tutorial we will focus on the second option: customizing our Kubernetes resources and see when to use one strategy of patching or the other.
Now we saw how Kustomize can be used, we need to learn one last notion: bases and overlays
Notion of overlaying
With Kustomize, we always start from one original resource configuration file. In our use case, we will start from one deployment yaml file which will configure how to deploy a workload within a kubernetes cluster.
Once we have this original file, we will see how kustomize can apply changes with overlays with the transformation of the original file without touching it.
We will apply here a special overlay transformation: a patch by patching here the number of workloads which can change between the different environments: DEV, QA, PROD.
In DEV for example we will need one instance, for QA we can test a bit how workload handles scaling by going up to 3 instances. At last on PROD we will apply 6 instances.
We will first create the original deployment YAML file as we always do when we work with kubernetes.
This file will never need to be changed to be used on the different environments.
Now we have the original resource manifest, we will need another file that Kustomize will consume so as to be able to apply the overlaying transformation:
Basically Kustomize uses patches to introduce environment specific changes on an already existing standard config file without disturbing it.
So our deployment yaml file will be left unchanged.
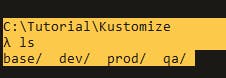
Let's first organise our demo. We will have one base directory and three different "overlay" directory (one for each environment: dev qa and prod)
First create a directory called "Kustomize"
Then create a directory called "base".
"base" directory will contain the original yaml file which will describe our deployment resource. It will be left untouched by Kustomize. By convention we can store it in one directory called "base". We only need one special file within our base directory:
"base" directory will be contrasted with the "overlays" directory we will create and which will only contain the variation to apply over the original by transformation.
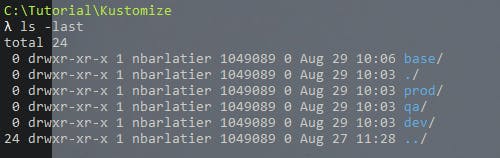
Then we create 3 "overlay" directories for the environments: dev, qa, prod.
At the end we get:
So let's go inside the "base" directory with
C:\Tutorial\Kustomize
λ cd base\
We will start by generating a YAML deployment file from kubectl with the dry-run which will create the YAML deployment configuration file from a basic kubetctl command.
And we will use for our demo the nginx application using the nginx docker image.
For this we can use the command:
# kubectl create deployment --image=nginx mynginx --dry-run=client -o yaml
That command does two things:
- Build the deployment with the command create deployment called mynginx (we can use any name) mynginx will be the deployment name. The deployment will use the docker image nginx without any tag (it means the command will take the very last version)
- Display in yaml the result of the kubectl run command in the standard out.
We get the following result
λ kubectl create deployment --image=nginx mynginx --dry-run=client -o yaml
apiVersion: apps/v1
kind: Deployment
metadata:
  creationTimestamp: null
  labels:
    app: mynginx
  name: mynginx
spec:
  replicas: 1
  selector:
    matchLabels:
      app: mynginx
  strategy: {}
  template:
    metadata:
      creationTimestamp: null
      labels:
        app: mynginx
    spec:
      containers:
      - image: nginx
        name: nginx
        resources: {}
status: {}
Let's save it to our deployment yaml configuration file within the base directory with the command
λ kubectl create deployment --image=nginx mynginx --dry-run=client -o yaml > deployment.yaml

Let's see the content of the file:
C:\Tutorial\Kustomize\base
λ cat deployment.yaml
apiVersion: apps/v1
kind: Deployment
metadata:
  creationTimestamp: null
  labels:
    app: mynginx
  name: mynginx
spec:
  replicas: 1
  selector:
    matchLabels:
      app: mynginx
  strategy: {}
  template:
    metadata:
      creationTimestamp: null
      labels:
        app: mynginx
    spec:
      containers:
      - image: nginx
        name: nginx
        resources: {}
status: {}
Let's remove the null and empties values:
apiVersion: apps/v1
kind: Deployment
metadata:
  labels:
    app: mynginx
  name: mynginx
spec:
  replicas: 1
  selector:
    matchLabels:
      app: mynginx
  template:
    metadata:
      labels:
        app: mynginx
    spec:
      containers:
      - image: nginx
        name: nginx
We have the file:
λ ls -last
total 1
1 -rw-r--r-- 1 xxx 1049089 392 Aug 29 17:45 deployment.yaml
0 drwxr-xr-x 1 xxx 1049089   0 Aug 29 10:06 ./
0 drwxr-xr-x 1 xxx 1049089   0 Aug 29 10:03 ../
Let's apply it and see if it works:
C:\Tutorial\Kustomize\base
λ kubectl apply -f deployment.yaml
deployment.apps/mynginx created

λ kubectl get deploy
NAME      READY   UP-TO-DATE   AVAILABLE   AGE
mynginx   1/1     1            1           56s
Ok now we are sure this deployment configuration yaml file is valid, we can start looking how to tell Kustomize about it in the "base" directory !
But first thing we need to check if Kustomize is within our Kubectl :)
C:\Tutorial\Kustomize\base
λ kubectl kustomize --help
Build a set of KRM resources using a 'kustomization.yaml' file. The DIR argument must be a path to a
directory containing 'kustomization.yaml', or a git repository URL with a path suffix specifying
same with respect to the repository root. If DIR is omitted, '.' is assumed.

Examples:
  # Build the current working directory
  kubectl kustomize

  # Build some shared configuration directory
  kubectl kustomize /home/config/production

  # Build from github
  kubectl kustomize https://github.com/kubernetes-sigs/kustomize.git/examples/helloWorld?ref=v1.0.6

Options:
      --enable-alpha-plugins=false: enable kustomize plugins
      --enable-helm=false: Enable use of the Helm chart inflator generator.
      --enable-managedby-label=false: enable adding app.kubernetes.io/managed-by
  -e, --env=[]: a list of environment variables to be used by functions
      --helm-command='helm': helm command (path to executable)
      --load-restrictor='LoadRestrictionsRootOnly': if set to 'LoadRestrictionsNone', local
kustomizations may load files from outside their root. This does, however, break the relocatability
of the kustomization.
      --mount=[]: a list of storage options read from the filesystem
      --network=false: enable network access for functions that declare it
      --network-name='bridge': the docker network to run the container in
  -o, --output='': If specified, write output to this path.
      --reorder='legacy': Reorder the resources just before output. Use 'legacy' to apply a legacy
reordering (Namespaces first, Webhooks last, etc). Use 'none' to suppress a final reordering.

Usage:
  kubectl kustomize DIR [flags] [options]

Use "kubectl options" for a list of global command-line options (applies to all commands).
Let's try the first example:
 # Build the current working directory
  kubectl kustomize
We get the result:
C:\Tutorial\Kustomize\base
λ kubectl kustomize
Error: unable to find one of 'kustomization.yaml', 'kustomization.yml' or 'Kustomization' in directory 'C:\Tutorial\Kustomize\base'
Ok now we know we have the choice between:
- kustomization.yaml or kustomization.yml
- even a directory Kustomization
Let's create the following file: kustomization.yaml with only the content:
resources:
  - deployment.yaml
Nothing else.
At the end we have:
C:\Tutorial\Kustomize\base
λ ls -last
total 6
4 drwxr-xr-x 1 nbarlatier 1049089   0 Aug 30 22:16 ./
1 -rw-r--r-- 1 nbarlatier 1049089  31 Aug 30 22:14 kustomization.yaml
1 -rw-r--r-- 1 nbarlatier 1049089 392 Aug 29 17:45 deployment.yaml
0 drwxr-xr-x 1 nbarlatier 1049089   0 Aug 29 10:03 ../
Let's see what will Kustomize do when we use with kubectl:
C:\Tutorial\Kustomize\base
λ kubectl kustomize
apiVersion: apps/v1
kind: Deployment
metadata:
  creationTimestamp: null
  labels:
    app: mynginx
  name: mynginx
spec:
  replicas: 1
  selector:
    matchLabels:
      app: mynginx
  strategy: {}
  template:
    metadata:
      creationTimestamp: null
      labels:
        app: mynginx
    spec:
      containers:
      - image: nginx
        name: nginx
        resources: {}
status: {}
It just redisplays the deployment content which is very similar with the kubectl create deployment with -dry-run=client -o yaml ! Kustomize must use it behind the scenes. :-)
Now we have the "base", now let's see the "overlays" by going in the dev folder:
C:\Tutorial\Kustomize\base
λ cd ..\dev

C:\Tutorial\Kustomize\dev
Let's add the Let's create the following Dev Overlay File: kustomization.yaml with the following content:
λ cat kustomization.yaml
apiVersion: kustomize.config.k8s.io/v1beta1
kind: Kustomization
bases:
  - ../base
patchesStrategicMerge:
  - numberReplica.yaml
The overlay file always refences the base so Kustomize knows what resource to target. We use the patchesStrategicMerge strategy to changes the number of replicas. At last we give the yaml file name which will contain the number of replica for the Dev environment here: numberReplica.yaml with the following content:
apiVersion: apps/v1
kind: Deployment
metadata:
    name: mynginx
spec:
    replicas: 2
In this overlay file we just tell it to target the deployment mynginx and set the number of replicas to 2!
So now we are ready to test how to overlay the base for the Dev and display the result of this transformation without touching the base and overlays files.
Let's remember our files and directories structure:
C:\Tutorial  (Tutorial@1.0.0)
λ tree Kustomize\ /f
Folder PATH listing for volume OS
Volume serial number is C0000100 8021:2C9C
C:\TUTORIAL\KUSTOMIZE
├───base
│       deployment.yaml
│       kustomization.yaml
│
├───dev
│       kustomization.yaml
│       numberReplica.yaml
│
├───prod
└───qa
Let's apply the kustomization with the dev environment, it is very simple with the help of kubectl and the command kustomize we just pass the dev directory :
λ kubectl kustomize Kustomize\dev\
We get the following display
C:\Tutorial  (Tutorial@1.0.0)
λ kubectl kustomize Kustomize\dev\
apiVersion: apps/v1
kind: Deployment
metadata:
  labels:
    app: mynginx
  name: mynginx
spec:
  replicas: 2
  selector:
    matchLabels:
      app: mynginx
  strategy: {}
  template:
    metadata:
      labels:
        app: mynginx
    spec:
      containers:
      - image: nginx
        name: nginx
        resources: {}
status: {}
We can see the number of replicas is 2 now! We have to be careful when we create the overlay yaml file to respect the correct yaml indentation so the patch merge select the proper key value tuple in the yaml.
Let's do the same thing for QA and PROD:
The kustomization.yaml file doesn't change:
kustomization.yaml:
apiVersion: kustomize.config.k8s.io/v1beta1
kind: Kustomization
bases:
  - ../base
patchesStrategicMerge:
  - numberReplica.yaml
Only the numberReplica.yaml file changes for QA and PROD with the number of replicas:
For QA :
apiVersion: apps/v1
kind: Deployment
metadata:
  name: mynginx
spec:
  replicas: 4
For PROD:
apiVersion: apps/v1
kind: Deployment
metadata:
  name: mynginx
spec:
  replicas: 8
Let see the final tree:
C:\Tutorial  (Tutorial@1.0.0)
λ tree Kustomize\ /f
Folder PATH listing for volume OS
Volume serial number is C0000100 8021:2C9C
C:\TUTORIAL\KUSTOMIZE
├───base
│       deployment.yaml
│       kustomization.yaml
│
├───dev
│       kustomization.yaml
│       numberReplica.yaml
│
├───prod
│       kustomization.yaml
│       numberReplica.yaml
│
└───qa
        kustomization.yaml
        numberReplica.yaml
Let's test how Kustomize helps us to have 3 different yaml deployment configurations for each environment without changing the original deployment.yaml :)
C:\Tutorial\Kustomize
λ kubectl kustomize dev
apiVersion: apps/v1
kind: Deployment
metadata:
  labels:
    app: mynginx
  name: mynginx
spec:
  replicas: 2
  selector:
    matchLabels:
      app: mynginx
  strategy: {}
  template:
    metadata:
      labels:
        app: mynginx
    spec:
      containers:
      - image: nginx
        name: nginx
        resources: {}
status: {}

C:\Tutorial\Kustomize
λ kubectl kustomize qa
apiVersion: apps/v1
kind: Deployment
metadata:
  labels:
    app: mynginx
  name: mynginx
spec:
  replicas: 4
  selector:
    matchLabels:
      app: mynginx
  strategy: {}
  template:
    metadata:
      labels:
        app: mynginx
    spec:
      containers:
      - image: nginx
        name: nginx
        resources: {}
status: {}

C:\Tutorial\Kustomize
λ kubectl kustomize prod
apiVersion: apps/v1
kind: Deployment
metadata:
  labels:
    app: mynginx
  name: mynginx
spec:
  replicas: 8
  selector:
    matchLabels:
      app: mynginx
  strategy: {}
  template:
    metadata:
      labels:
        app: mynginx
    spec:
      containers:
      - image: nginx
        name: nginx
        resources: {}
status: {}
We can see the number of replicas changes for each environment:
- dev : 2
- qa : 4
- prod: 8
Till now we only use Kustomize to display the result of the transformation. It is not applied to the kubernetes cluster.
Let's see now how we apply the kustomization to our cluster:
It is very simple we use
kubectl apply -k EnvDirectory
For Dev we get:
C:\Tutorial\Kustomize
λ kubectl apply -k dev
deployment.apps/mynginx created
Let's check the deployment:
C:\Tutorial\Kustomize
λ kubectl get deployment
NAME      READY   UP-TO-DATE   AVAILABLE   AGE
mynginx   2/2     2            2           57s
We have indeed 2 replicas as expected!
Let's apply the kustomization for QA:
C:\Tutorial\Kustomize
λ kubectl apply -k qa
deployment.apps/mynginx configured
We noticed the deployment is configured and not created because I only changed the number of replicas, but in real world we should change the namespace or even the cluster configuration for kubectl.
But I wanted to focus only on Kustomize here with the simplest form.
Let's check again the deployment:
C:\Tutorial\Kustomize
λ kubectl get deployment
NAME      READY   UP-TO-DATE   AVAILABLE   AGE
mynginx   4/4     4            4           3m59s
At last let's check the PROD
C:\Tutorial\Kustomize
λ kubectl apply -k prod
deployment.apps/mynginx configured

C:\Tutorial\Kustomize
λ kubectl get deployment
NAME      READY   UP-TO-DATE   AVAILABLE   AGE
mynginx   4/8     8            4           4m36s

C:\Tutorial\Kustomize
λ kubectl get deployment
NAME      READY   UP-TO-DATE   AVAILABLE   AGE
mynginx   8/8     8            8           4m57s
We got the 8 instances we wanted declaratively!
So now let's summarize:
- We used one type of overlay: the patch with the patchesStrategicMerge strategy so we can change the number of replicas per environment
- We saw how to see the kustomization result without touching our cluster
- We saw how to apply the kustomization to our deployment on our cluster per environment
That is all Folks! Next time we will dig in more and see how to change the namespace and uses other types of strategy available with Kustomize.
Thanks for reading this article, if you liked it I would be grateful if you can give a like or follow me. Have a nice day!