3-node K3S cluster with etcd and MetalLB on bare-metal systems
Cloud Service Providers make it very easy to spin up a Kubernetes cluster with simple commands in their CLI or a few click in their web portal. Setting up Kubernetes without the cloud infrastructure provided, at the edge or for a home lab usage is not so simple as the whole infrastructure, including networking needs to be taken into consideration.
K3S is a lightweight Kubernetes distribution designed to work with devices suitable for edge workloads. It is simplified and has a very small footprint, besides the fact that the convenience scripts for installation make onboarding process a lot easier.
In this tutorial I’m creating a 3-node cluster using etcd key-value store and MetalLB for load balancer.
etcd is used to sync configuration amongst our 3 nodes while MetalLB is used for load balancing where one accessible IP in the network will be used as entry point for the traffic that will then be routed to available nodes accordingly.
etcd is very mature and used in many scenarios. MetalLB is in Beta phase, but its project page claims it has been used inproduction and non-production clusters by companies and individuals. While it may be soon or risky to adopt MetalLB in large scale, it has been stable and useful in the tests I have been doing in my home lab.
With K3S we can go from very low power to higher performance devices to scale how many workloads each device can support. Which device to use has many variables that need to be assessed in order to make a decision.
In this example, I’m using 3 mini PCs with 16 GB of DDR5 RAM and 500 GB of NVMe storage drive. This was a good configuration for my usage and price target that has 2 integrated network devices. The model I have purchased comes with 2 network devices, but I’m not leveraging the second LAN in this setup. It is useful though when management and workload traffic need to be separated.
My topology is currently this:
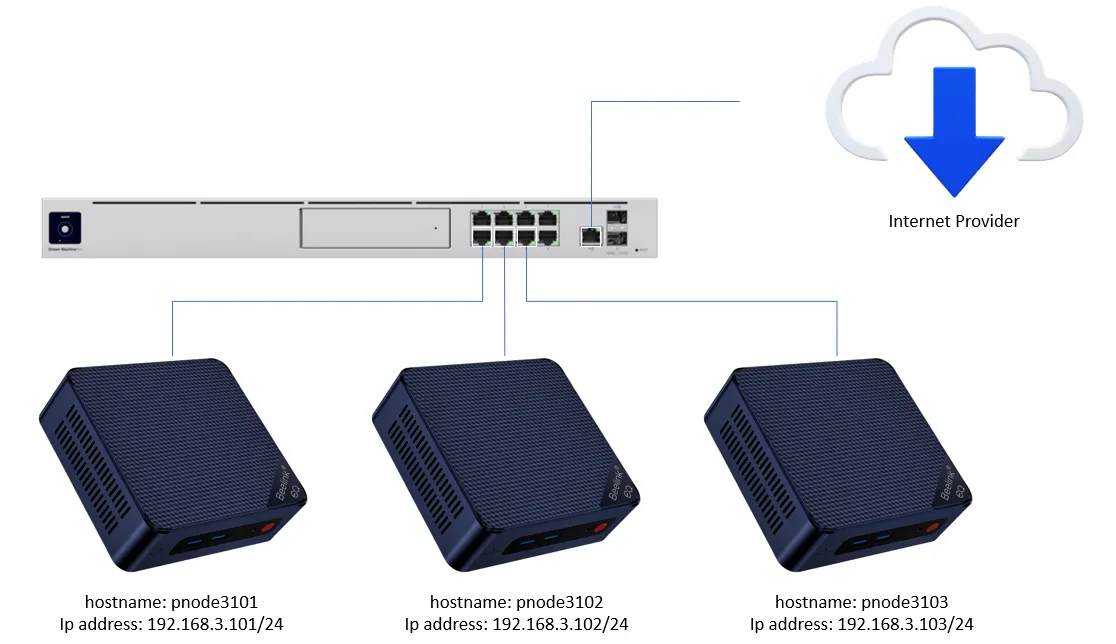
In this configuration example, 192.168.3.101 is the primary node that will be installed, and the other 2 nodes join the cluster afterwards. I like to use pnodeNNNN for physical node and vnodeNNNN for virtual node as prefixes, where NNNN can be an incremental number or like in this example, a mirror of the last octets of the subnet + Ip address.
I’m using Fedora Server 38 as baseline operating system. Fedora Server comes with a very handy web interface for management called Cockpit. See Cockpit Project for more information.
It can be accessed by navigating in your preferred browser to https://<hostname or ip of your server:9090. We can then use the built-in web based shell as an alternative to ssh from the host to the server. This is how the console looks like:

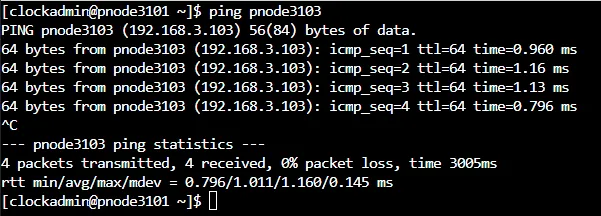
We could configure a DNS (domain name server) in the network to resolve the Ip address ← → hostname for the servers, but for a test or small-scale installation, adding the Ip addresses and hostnames directly in the hosts file serves the purpose (in all nodes):
sudo vim /etc/hosts

# Then add the following lines,
# replacing with your Ip addresses and hostnames:
192.168.3.101 pnode3101 pnode3101.clockcode.local
192.168.3.102 pnode3102 pnode3102.clockcode.local
192.168.3.103 pnode3103 pnode3103.clockcode.local
We can then test if it is working by poking the nodes with ping command and the hostname:
In order to have both K3S and MetalLB working properly, there are serveral firewall rules that need to be in place. Let’s start by applying those rules using firewall-cmd command (in all nodes):
sudo firewall-cmd --permanent --add-service=ssh
sudo firewall-cmd --permanent --add-service=http
sudo firewall-cmd --permanent --add-service=https

sudo firewall-cmd --permanent --zone=trusted --add-source=10.42.0.0/16 #pods
sudo firewall-cmd --permanent --zone=trusted --add-source=10.43.0.0/16 #services

sudo firewall-cmd --permanent --new-service=k3s
sudo firewall-cmd --permanent --service=k3s --set-description="K3S Firewall Rules"
sudo firewall-cmd --permanent --service=k3s --add-port=2379/tcp
sudo firewall-cmd --permanent --service=k3s --add-port=2380/tcp
sudo firewall-cmd --permanent --service=k3s --add-port=6443/tcp
sudo firewall-cmd --permanent --service=k3s --add-port=8472/udp
sudo firewall-cmd --permanent --service=k3s --add-port=10250/tcp
sudo firewall-cmd --permanent --service=k3s --add-port=51820/udp
sudo firewall-cmd --permanent --service=k3s --add-port=51821/udp
sudo firewall-cmd --permanent --add-service=k3s

sudo firewall-cmd --reload
See K3S Network Requirements and Additional OS Preparations for more information.
Now, let’s create a secret for installing the K3S instance and being able to joing additional nodes to the cluster. We can do this by many ways, one being using openssl as such:
openssl rand -hex 10 > k3s_secret.txtThis will create a random hexadecimal value. You can increase the number after -hex if you want a bigger secret, for example.
We can then copy the k3s_secret.txt to the nodes and use it in the installation command line.
In the primary node, we can then install K3S server with the following command (run on first node only):
curl -sfL https://get.k3s.io | K3S_TOKEN=`cat k3s_secret.txt` sh -s - server --cluster-init --disable=servicelbThis command will fetch the convenience script from K3S and install this first node as control-pane, etcd and master node.
We can check the status of the node with:
sudo kubectl get nodes
Note that we are using disable servicelb option as MetalLB requires it as described in Issues with K3s.
We will use the same profile for the additional nodes, but the command line changes a bit (run same command in both additional nodes):
# Replace with the ip address or hostname of your server
curl -sfL https://get.k3s.io | K3S_TOKEN=`cat k3s_secret.txt` sh -s - server --server https://pnode3101.clockcode.local:6443 --disable=servicelb
Once both additional nodes have been joined to the cluster, we should have the following output to the get nodes command:

Now that the K3S cluster is installed we can configure the load balancer to distribute network accessible Ip addresses to services installed in the cluster. We can check this with the following command:
sudo kubectl get services --all-namespacesAt this point it is possible to see that the traefik load balancer service that comes built-in with K3S has pending status to external-ip setting.

This is due to the fact we didn’t activate the load balancer with Ip address assignment, which we will accomplish by enabling MetalLB.
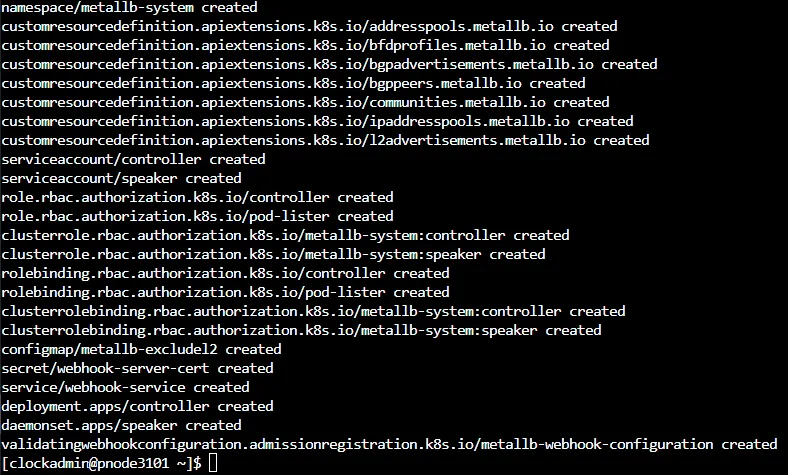
There are few ways of installing MetalLB. For this tutorial I’m using the kubectl apply by providing a manifest, using the following command:
sudo kubectl apply -f https://raw.githubusercontent.com/metallb/metallb/v0.13.10/config/manifests/metallb-native.yamlThe following output should pop on the screen:
Now, we need to configure the Layer-2 and advertisement settings in MetalLB, including the IP addresses reserved for the load balancer.
In my example, I’m reserving a range of Ip addresses that are not within my local network Dynamic Host Configuration Protocol (DHCP):
sudo kubectl apply -f - <<EOF
apiVersion: metallb.io/v1beta1
kind: IPAddressPool
metadata:
  name: k3s-lb-pool
  namespace: metallb-system
spec:
  addresses:
  - 192.168.3.51-192.168.3.100
---
apiVersion: metallb.io/v1beta1
kind: L2Advertisement
metadata:
  name: k3s-lb-pool
  namespace: metallb-system
EOF
The output of the command should be something like this:

Now, if we probe the services in the cluster once again we should see that the traefik load balancer has an Ip address within the range we have configured.

We are ready to start deploying custom services to our K3S cluster. We can do a final test to make sure everything is working fine by deploying a ngnix service and exposing via our now configured MetalLB load balancer.
sudo kubectl create deployment nginx --image=nginx
sudo kubectl expose deployment nginx --type=LoadBalancer --name=nginx --port=80 --protocol=TCP
We should now see a new service of type LoadBalancer created for our nginx deployment:

We can try to access the Ip address and look for the nginx welcome message.

We can also perform cleanup of this service, if no longer desired/in use by using the following command:
sudo kubectl delete all -l app=nginxThe parameter -l is used for picking a selector, which is a key/value pair, in this case, filtering app that is named nginx. The output should be similar to this one:

This tutorial did not explore more advanced settings such as certificate management and installation, but I hope it is a good starting point for folks that want to quickly spin up a Kubernetes cluster.