Learn how to deploy k3s to a Raspberry Pi cluster with ClusterHat and ClusterCTRL.
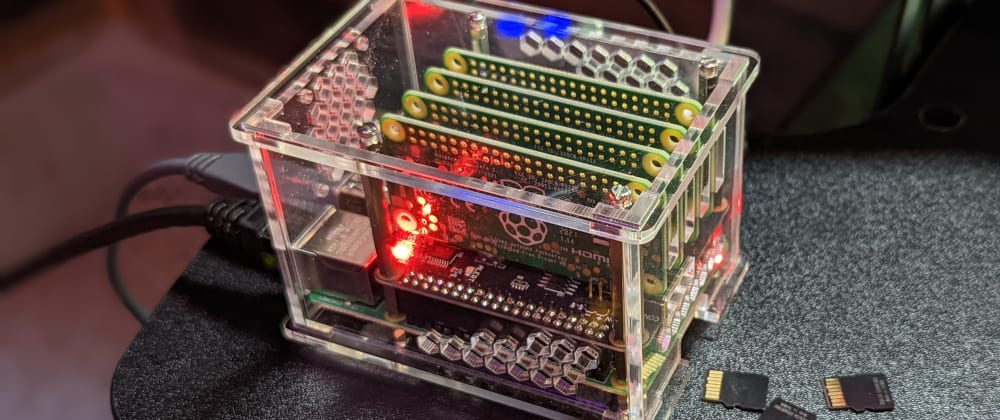
Hardware
- 1 x 8GB Raspberry Pi 4
- 4 x Raspberry Pi Zero 2 W
- 1 x ClusterHat v2.5
- 5 x SD Card
Custom OS Images
Because you are using a ClusterHat, you will want to use custom OS images. For this guide you will be using the 64-bit versions of each and the CNAT Lite version for the controller. Enable SSH for each of the images. The username does not have to be pi but the username needs to be the same, across each of the nodes, for this guide. As you burn each of the SD Cards, place each one into their respective device, to keep them organized. The P1 node is the slot that is on the same side as the ethernet controller. The nodes increase, in order, to P4, which is on the same side as the power and HDMI connectors. You can refer to an earlier post, for detailed steps using Raspberry Pi Imager to create the SD Cards.
First Boot
With each SD card inserted into their respective nodes, you can turn on the control node. The ClusterHat will provide power and networking to the additional nodes. Power for each of the nodes can be controlled independently. You can connect to the device over SSH via WIFI, or via ethernet, depending on what you enabled in the previous step.
Connect to the control node and power on P1:
pi@control-node:~ $ clusterctrl on p1
You will see the green LED light up and the node will begin booting up.
Power up the other nodes:
pi@control-node:~ $ clusterctrl on p2 && clusterctrl on P3 && clusterctrl on p4
Update the OS Images
Update each of the images, from the upstream repositories, to get any of the changes made since the OS image was released.
Start with the control node:
pi@control-node:~ $ sudo apt update && sudo apt dist-upgrade -y
Optionally, add the following lines to /etc/hosts, on the control node:
172.19.181.1    p1
172.19.181.2    p2
172.19.181.3    p3
172.19.181.4    p4
You can also use the IP address directly.
Update each of the additional nodes via ssh:
pi@control-node:~ $ ssh p1 'sudo apt update && sudo apt dist-upgrade -y'
pi@control-node:~ $ ssh p2 'sudo apt update && sudo apt dist-upgrade -y'
pi@control-node:~ $ ssh p3 'sudo apt update && sudo apt dist-upgrade -y'
pi@control-node:~ $ ssh p4 'sudo apt update && sudo apt dist-upgrade -y'
At the time of writing this article, an additional change is required for the base OS on each node. This change is needed in order to run containers, as the defaults for cgroups has changed recently.
Add the following configuration to /boot/cmdline.txt on each node and then reboot:
cgroup_memory=1 cgroup_enable=memory
Ready for k3s
The documentation for k3s is incredible. For this guide, you will use another tool called k3sup to deploy the k3s cluster.
First install k3sup:
pi@control-node:~ $ sudo curl -sLS https://get.k3sup.dev | sh
Install the control node of k3sup:
pi@control-node:~ $ k3sup install --ip 172.19.181.254 --user $(whoami)
That process will end with output similar to this:
...
Saving file to: /home/pi/kubeconfig

# Test your cluster with:
export KUBECONFIG=/home/pi/kubeconfig
kubectl config set-context default
kubectl get node -o wide
pi@control-node:~ $
After setting up your context and verifying your control node is ready, add the other nodes to the cluster.
pi@control-node:~ $ k3sup join --ip 172.19.181.1 --server-ip 172.19.181.254 --user $(whoami)
pi@control-node:~ $ k3sup join --ip 172.19.181.2 --server-ip 172.19.181.254 --user $(whoami)
pi@control-node:~ $ k3sup join --ip 172.19.181.3 --server-ip 172.19.181.254 --user $(whoami)
pi@control-node:~ $ k3sup join --ip 172.19.181.4 --server-ip 172.19.181.254 --user $(whoami)
You now have a kubernetes cluster, deployed to about $100 of hardware.
pi@control-node:~ $ kubectl get node
NAME STATUS ROLES AGE VERSION
control-node Ready control-plane,master 25m v1.24.3+k3s1
p1 Ready <none> 20m v1.24.3+k3s1
p2 Ready <none> 20m v1.24.3+k3s1
p3 Ready <none> 22m v1.24.3+k3s1
p4 Ready <none> 19m v1.24.3+k3s1
pi@control-node:~ $
Test deployment
Deploy an ARM64 native Spring Boot application to the cluster:
Create a file, spring-boot-native-pi.yaml
---
apiVersion: apps/v1
kind: Deployment
metadata:
  name: spring-boot-native-pi
spec:
  selector:
    matchLabels:
      app: springbootnativepi
  replicas: 4
  template:
    metadata:
      labels:
        app: springbootnativepi
    spec:
      containers:
      - name: springbootnativepi
        image: dashaun/spring-pi-native:focal-arm64
        ports:
        - containerPort: 8080
---
apiVersion: v1
kind: Service
metadata:
  name: web-service
spec:
  selector:
    app: springbootnativepi
  ports:
    - protocol: TCP
      port: 8080
Verify:
pi@control-node:~ $ kubectl get pods
NAME READY STATUS RESTARTS AGE
spring-boot-native-pi-59f7d7659c-hvlp8 1/1 Running 0 42m
spring-boot-native-pi-59f7d7659c-dp7nn 1/1 Running 0 42m
spring-boot-native-pi-59f7d7659c-sf899 1/1 Running 0 42m
spring-boot-native-pi-59f7d7659c-99vfq 1/1 Running 0 42m
pi@control-node:~ $
Summary
In this guide, you learned how to deploy k3s on top of the custom OS images provided by ClusterHat, with Raspberry Pi.


Top comments (0)